Twitter
& Facebook-free zone. This web page is for grownups.
How to remove the
MP3-05(G) player from your 2009 Hyundai Getz
(and replace it with a better
aftermarket one)

If you've got one of these factory-installed players and you
can't take any more of:
"Random play" from a USB drive which constantly plays some tracks and
you never hear others (all in the same folder).
A very basic display which goes blank or into a mode you don't want and
stays like that when you play an MP3 file which doesn't have ID3
information.
Constant (often partial) repeat of one track when you first drive the
car.
Jumping to another track when you start the car (in random play mode).
Random complete resets which lose all your radio and other settings.
Quickly flattening your mobile phone battery because this unit forces
the Bluetooth Hifi Streaming to keep starting even if you're not
listening to it.
Flakey Bluetooth performance including regularly failing to connect to
your phone, the person you're talking to barely being able to hear you,
not correctly downloading your phone's phonebook, and the Bluetooth
symbols not appearing on the display even though your phone's
connected.
Having this unit constantly trying to pair with every mobile phone in
the vicinity, making it almost impossible to use a separate Bluetooth
handsfree unit instead of it.
You're at the right page because I've been through it all too.
:-(
PLEASE READ THE DISCLAIMER AT THE BOTTOM OF THIS PAGE BEFORE
PROCEEDING.
Step 1: Remove the
glovebox 'stops'


First completely empty the glove box (so as not to damage the hinges
after this step). Then push the glove box slightly forward, push the
stop from the outside and slide it towards you. Once it's partly free,
you can slide the rubber part out through the hole and put it in a safe
place. Same on the other side. Then carefully let the glove box hang
down on its hinges.
Step 2: Remove the
stereo's plastic surround

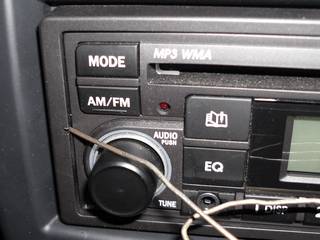
Poke a moderately thick paper clip into the hole and gently jiggle it
to lever the end of the surround off.
Once free, the other end of the surround should detach too.
Step 3: Pull out the
rear 3-pin connector

Reach through the glovebox opening with your left hand and with your
fingers locate the small connector at the end of the player closest to
you. Push down on its clip as the arrow shows, and pull it out. This
the connection to the steering wheel controls and the wires are not
very long. Only the most up-market aftermarket players have steering
wheel control capability and they usually need an additional expensive
interface box, so you'll probably lose that function.
Step 4: Release the
front retaining clips

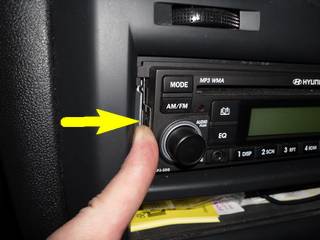
Reach through the glovebox opening with your left hand and push the
rear left corner of the player towards you. At the same time, push the
left side clip in the direction of the arrow until it releases and the
player moves forward slightly. Then with your left hand's fingers, find
the rear right-hand corner and do the mirror-image operation with the
other clip. Repeat with the left side if it re-locks.
Step 5: Remove the
player
Once the front clips are released, wiggle the back of the player from
side to side with your left hand as you push it forward. Mine had a
blob of heavy sound-deadening gunk between it and its cage, and I had
to use a fair bit of force to free it. Then pull the player out of its
hole and unplug the antenna and multi-pin connectors, and you can put
it away until you sell the car (that brought a smile to my face).
Installing a
replacement player
The easiest, neatest and fastest way to connect a new player (aka head
unit) to your Getz is by using adapter harnesses. First you need to get
an Aerpro APP085 harness which converts from the
Getz's stereo connector to two ISO connectors (Click
here to see it).
DO NOT try to use the APP086
shown for "Getz 2005 onwards" in the Aerpro catalog, because their
documentation is wrong and the
connector is not for a Getz, as
I found out the hard way.
Next you need to get a second adapter harness to go from the ISO
connectors to your chosen replacement player: click
here to see the Aerpro range.
Then you need to install your new player. The details will vary from
installation to installation and you need to work that out for
yourself. In my case, I installed my old faithful Kenwood KDC-MP4023
from my earlier car by transferring the Hyundai mounting clips onto it
after flattening the protrusions on the clips with pliers.

Then I connected it to the APP085 loom with an APP8KE one, plugged in
the antenna and slotted the unit into the hole.
It still sounds great (better than the MP3-05G), functions perfectly
and has none of the irritating habits of the Hyundai unit. :-)

Afterthoughts
Don't forget to clip the glovebox stops back into place after you
finish!
If you need a Bluetooth handsfree unit, Aldi
sometimes has some good ones on special very cheap.
DISCLAIMER
I've presented this information as accurately as I can, but
there may be unintentional errors and/or omissions. I will not be held
liable for any injury to you or damage to your car or its warranty, or
any player caused by following the above information. If you are not
familiar with working on cars and are unaware of the risks of injury
and damage from working on them, please disregard this web page.

Back to my home page...
Last update: 08 Mar, 2020


